
ubuntu下部署springboot项目jar包
小小总结,经验有限,轻喷
部署springboot项目jar包
SpringBoot打包
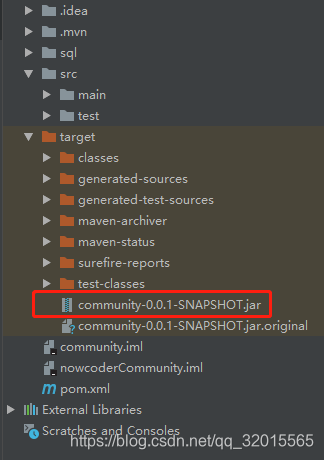
1、将springboot项目进行package,package成功后,将会在target目录下生成jar包文件。如下:

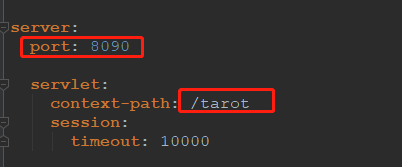
application.yml:
Nginx配置
1、Nginx配置路由转发(主要展示转发):
server
    {
        listen 80;
        #listen [::]:80;
        server_name test.xxx.club;
        index index.html index.htm index.php default.html default.htm default.php;
        root  /home/wwwroot/test.xxx.club;
        rewrite ^(.*)$    https://$host$1    permanent;
    }

server
    {
        listen 443 ssl http2;
        #listen [::]:443 ssl http2;
        server_name test.xxx.club ;
        index index.html index.htm index.php default.html default.htm default.php;
        root  /home/wwwroot/test.xxx.club;

        # server
        location /tarot {
               proxy_pass        http://localhost:8090/;
                proxy_set_header   Host             $host;
                proxy_set_header   X-Real-IP        $remote_addr;
                proxy_set_header   X-Forwarded-For  $proxy_add_x_forwarded_for;
          }
    }
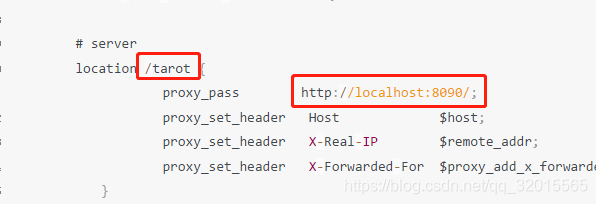
上述两个圈起来的红圈,Nginx在转发时,会通过配置文件中的访问,例如:域名/tarot 转发至域名项目目录下的jar项目中。但是因为在yml文件中配置了context-path,所以要访问你的项目接口,在浏览器的访问为:
http://test.xxx.club/tarot/tarot/接口名称 功能相当于idea中启动application后的访问。
第一个tarot为Nginx配置文件中的,第二个tarot为项目yml文件中的,要解决这个问题,只需要将yml中的context-path不进行配置就好了。这样访问为:
http://test.xxx.club/tarot/接口名称。
上传服务器
1、将jar包传到ubuntu上,如放入/home/wwwroots/test.xxx.club(这个为安装Nginx时配置的域名目录)下,可自行调整。
2、cd到jar所在目录,运行jar包程序
命令:java -jar community-0.0.1-SNAPSHOT.jar 这里测试没有使用nohup,根据需求使用
3、运行时可能会报错:
具体报错忘了,记得是:没有相应的清单,所了解的是如果package时,在pom.xml文件中,可能没有使用plugin
<plugin>
    <groupId>org.springframework.boot</groupId>
    <artifactId>spring-boot-maven-plugin</artifactId>
</plugin>
4、还有一个问题,就是在服务器上已有独立的tomcat,要讲项目部署过去,因为Tomcat已经有main函数入口,所以项目中的springbootApplication入口文件无法使用,这时候需要在同级目录下配置可以进入项目的入口文件。